
Waiting to head up “The Cables” at the saddle to Half Dome
Half Dome Hiking Trail
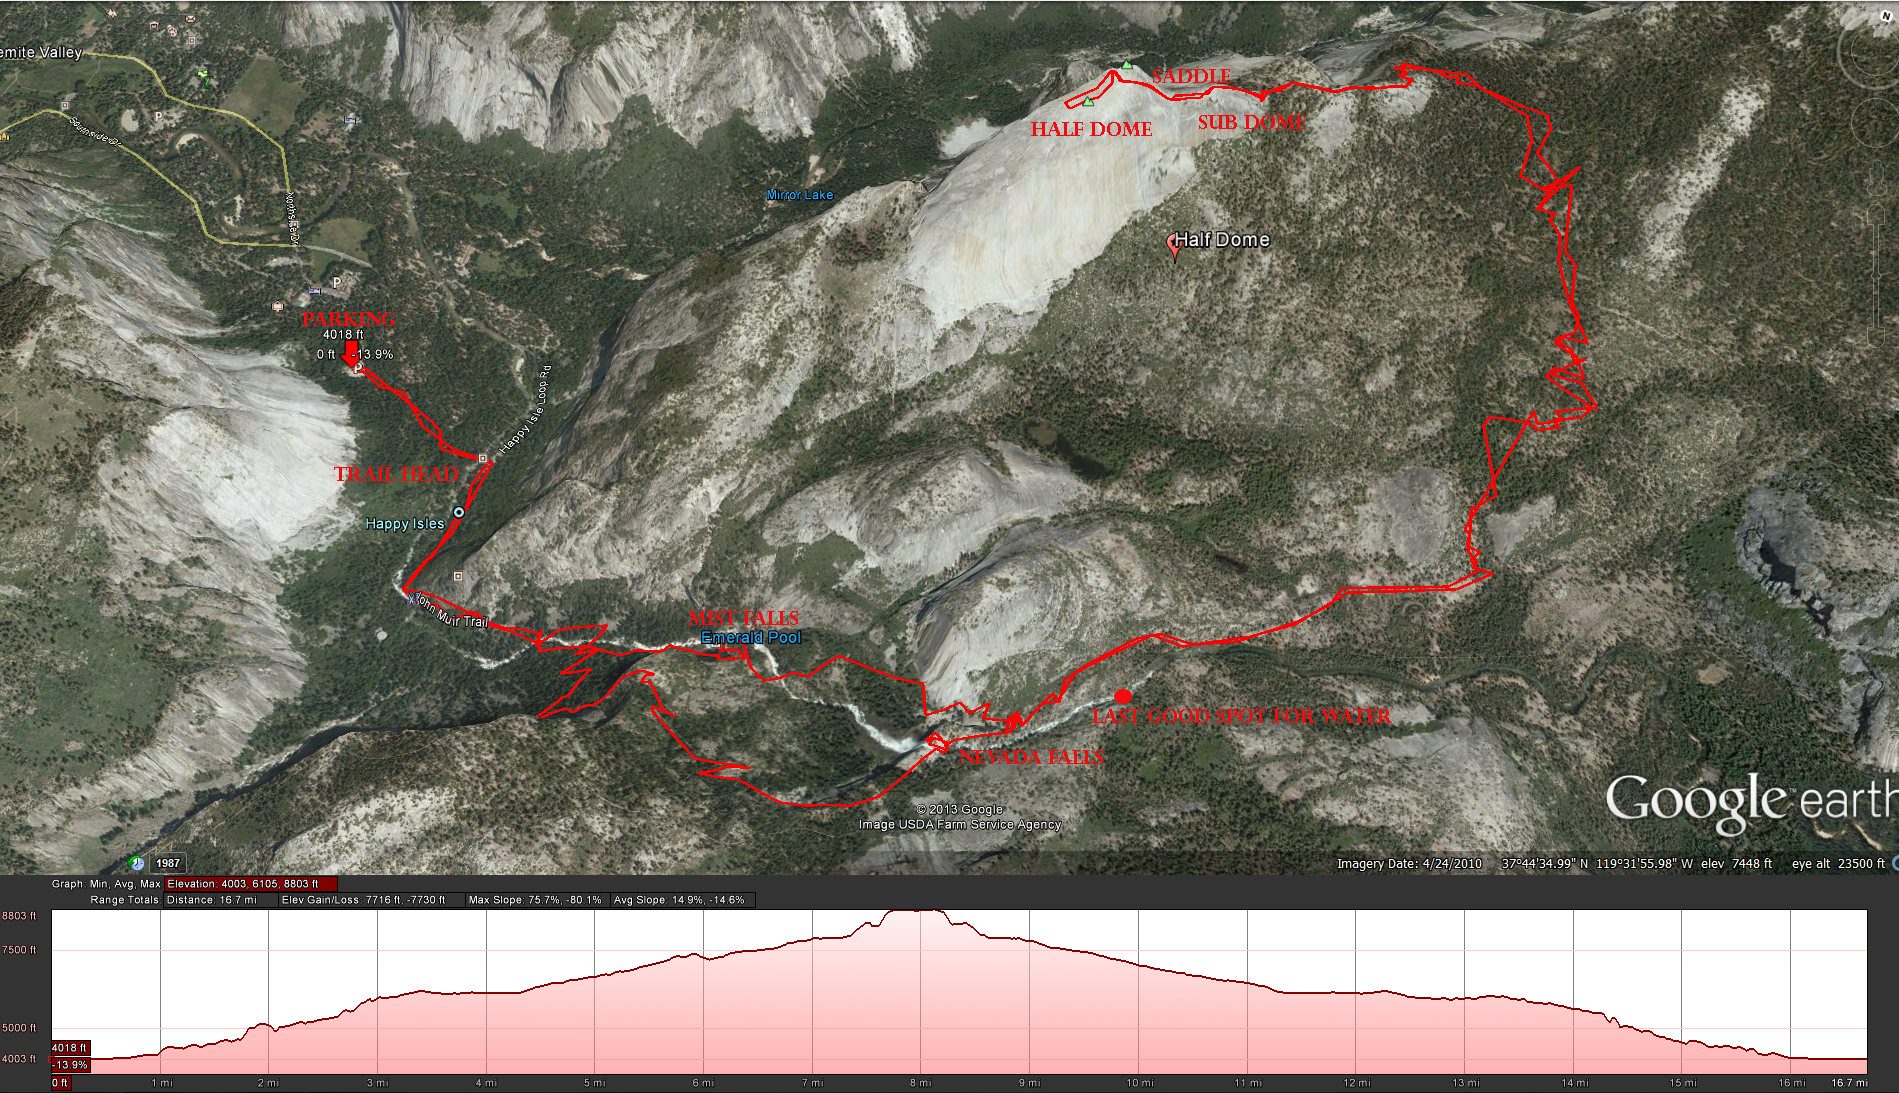
Distance: 14.2 miles round trip via Mist Trail, 16.5 miles round trip via John Muir Trail, 20 miles round trip via Glacier Point, 23 miles round trip via Tenaya Lake, 7 miles round trip from Little Yosemite Valley campground
Elevation Gain: 4,800 feet from Yosemite Valley. Half Dome Elevation: 8,842 feet
Time to complete: 10 – 14 hours
Permits:http://www.recreation.gov/wildernessAreaDetails.do?contractCode=NRSO&parkId=79064
When you decide you are going to go to Half Dome, realize that you are going to have to get into the Half Dome Permit Lottery as well in order to secure yourself a spot.
Map:http://www.yosemitehikes.com/yosemite-valley/half-dome/half-dome-trail-map.htm
First Video I did of this hike in October of 2012
2nd Video of Half Dome I did in June of 2014
Half Dome is THE hike to do in Yosemite, which is why you need to plan out your trip to Half Dome to make the most of it. First off is deciding when you and your friends can make it ( its always more fun to have friends along). Figure out the dates ahead of the lottery so that when you put in for your permit everyone is on the same page. You also need to figure out if you are going to be camping or staying in one of the lodges, tent cabins, or cabins that are offered in the valley. Once you figure out where you want to stay realize that the campgrounds go on sale at the same time you find out if you got your permit or not and the campgrounds sell out in about 20 minutes. It would behoove you to check out the campsites before hand to figure out where you want to stay, Yosemite has a nice web page that has the breakdown of the dates and the campground available.
The first time I stayed in Yosemite for the Half Dome hike we stayed at Curry Village in a small cabin which worked out well, the second time I went to Yosemite for the Half Dome hike we decided to make a camping experience out of it. At first the only place where I could find a reservation available was up at Crane Flat ( 17 miles out from the valley) I only secured the site for 2 days with the idea of grabbing a site at Camp 4 ( the only first come first serve campsite in Yosemite Valley) for the last two nights so we could be closer to the start of the hike. Crane Flat may be a little drive from the start of the hike but It was a nice place to stay, it was far removed from the valley so that you really felt you where away from everything but close enough to not be a complete pain in the ass. Now here is where the story gets interesting, if you can’t find a place with a open reservation ( I was checking several months out from the hike and nothing was available) keep checking the reservation site every day, you never know what you may find. A week out from the hike I found I site that opened up in the Upper Pines Campground and snatched it up while I could ( someone had obviously canceled their reservation for several days and it had just came up as being open) I keep checking the site and several other sites had opened up as the weekend was fast approaching ( so there is hope if you cant find a site right away). The second site we got in the Upper Pines Campground was perfect, your literally a 5 minute walk from the start of the Half Dome hike.
For most people trying this hike for the first time your going want to start early, I’ve hiked Half Dome twice now, each time starting at 6 am, the first time ( in October) we got back at 7 pm, and then second time ( in June ) we got back at 6 pm. If your late in the season like we where in October make sure you take a headlamp with you because your going to need it when you start and when you finish ( its always a good idea to pack one of these just in case anyways). When we hiked in June and there was plenty of light coming and going.
You also need to decide how you are going to hike Half Dome. If you want a little more challenging hike I recommend going up past Mist Falls (Vernal Falls) , and Nevada Falls before continuing on to Half Dome and then on the way down if you want to save you knees a little pain heading down the John Muir Trail and bypassing the stairs at Nevada and Mist Falls. The John Muir Trail is a little more forgiving and its nice to get a little different view of the valley below Nevada Falls but I will tell you that most of the trail is a cesspool of Horse Crap, your continually looking at the ground making sure you don’t step into a big pile of horse crap ( I don’t want to drag that into my tent later on). If you decide you don’t want the extra mile or so of trail by going the John Muir route you can always go up and down the same route past to two falls ( 14.2 miles up and down past the falls – vs – 16.5 miles round trip on the John Muir Trail – vs – 15.3 Miles up past the falls and down the John Muir Trail ).
Make sure you bring a water filter, some people can get away with carrying all the water they are going to need on this hike, but if you are a heavy sweater you are going to need to replenish your water supply at some point on the hike. Just past Nevada Falls along the trail you come very close to the Merced River and its easy to pop down there and drop your filter in and get some great tasting, clear, and cold water.
Make sure you also bring some gloves for the cables of Half Dome. You may be able to find a pair at the bottom of the cables that fits, buts its so much easier to just pop into your local hardware store and by a cheap pair of garden gloves ( I like the ones with rubber on the palms for a little extra grip as I’m going up the cables).
The Hike starts at the Happy Isles Trail head. Surprisingly the first mile is all on a paved pathway up to the Vernal Fall Footbridge ( Mist Falls), after which the trail splits, heading right goes up the John Muir Trail, and going straight heads up past Vernal Falls and Nevada Falls. If you head on up towards the falls you will eventually start to climb hundreds of steep granite steeps in order to get up to Vernal Falls, depending on what time of year you go ( the amount of water going over the falls) you will get a little wet from all the mist as you head past the falls ( another reason to come back down John Muir Trail so that you aren’t going down steep slippery steps), you can bring a poncho if you like but if not you will dry off soon enough anyways. Eventually as you pass by the right side of the falls you will reach a rough cut set of steps on the side of the cliff going up to above the falls, there are hand railings so its not that bad. You will come out of the steps and onto slopping granite slabs, just head down the slope and you will reach the top of the falls. There is a railing along the top of the falls and signs everywhere warning you not to climb over the railing and not to swim anywhere near the falls, if you do you could meet a tragic end like these hikers
View of the Falls full of water.
After you enjoy the view of the falls continue heading up towards Liberty Cap and Nevada Falls, you will pass over another foot bridge that gives you a great view of the raging waters before you start another climb up granite steps to the top of Nevada Falls. At the top you will see your last chance at a bathroom before you continue on with the hike. This is also where the trail meets back up with the John Muir Trail coming in from the left and the other side of Nevada Falls. This a good place to take a break, if you need to refill on water you will run into the Merced River not to far past this point on the trail, that will be your last chance to fill up on water, so if you are low don’t even think twice, you don’t want to be at the top of Half Dome without any water ( it will be another 4 miles before you get back to this spot after coming off Half Dome). As you head out away from the Merced River you follow a sandy ( pain in the ass) trail for a mile or so before you start heading back into the forest and going uphill again. Along this part of the trail you get a great view of the side of Half Dome along the left side of the trail, it shows you the silhouette of Sub Dome, the Saddle, and then the cables going up Half Dome.
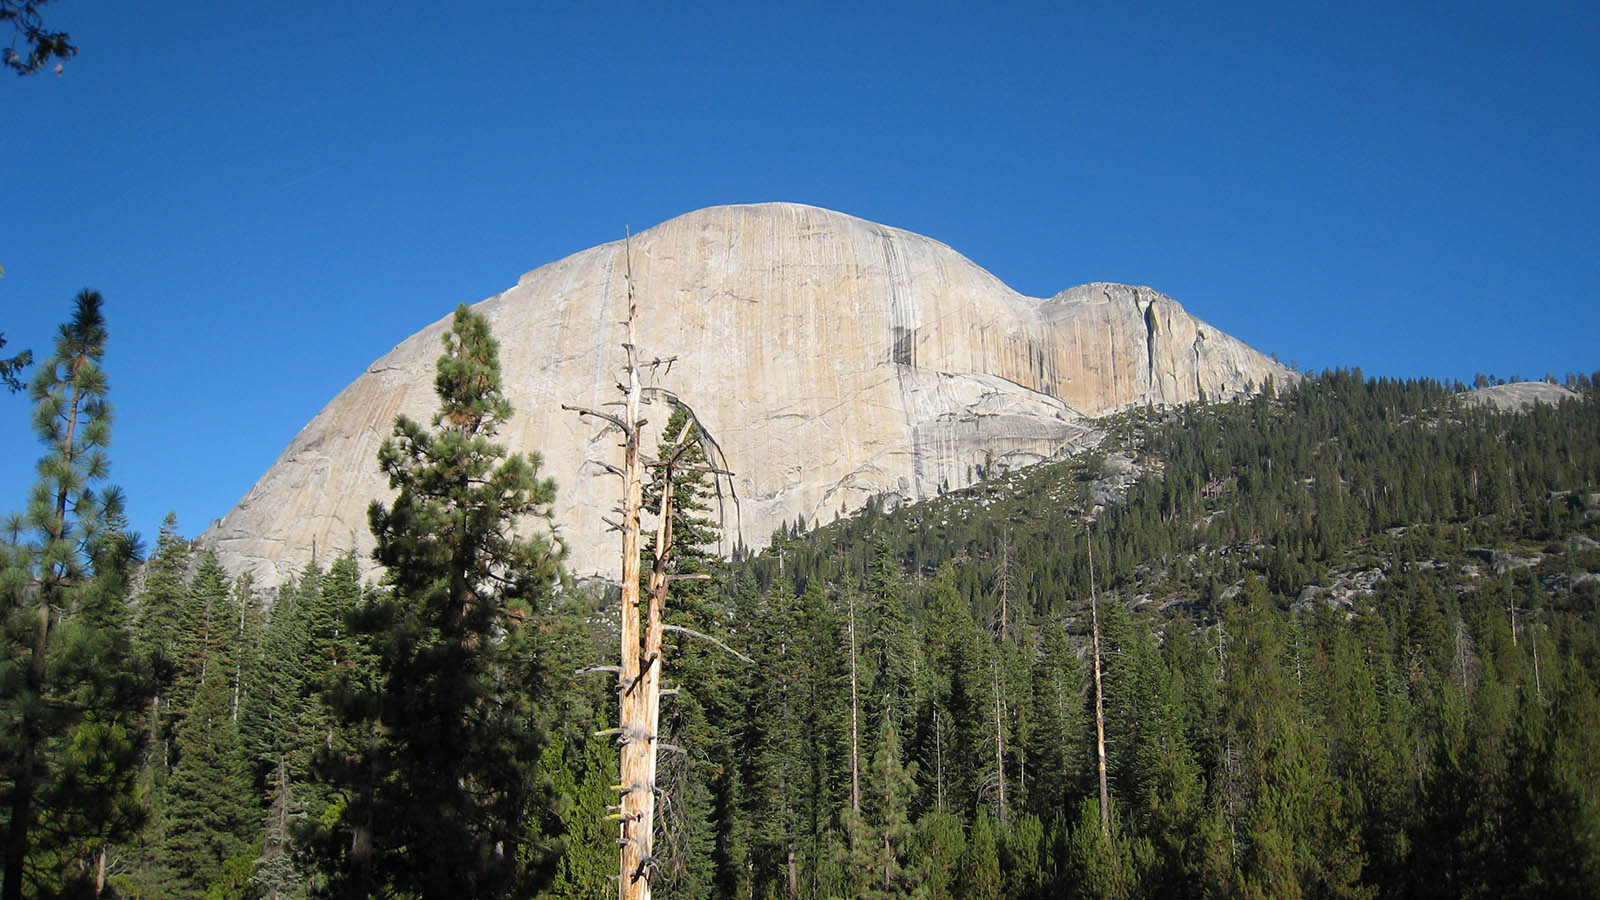
A great side shot of Sub Dome, The Saddle, and then Half Dome.
As you leave Little Yosemite Valley and start heading up the trail through the forest enjoy the shade and keep an eye open for wild life. We ran into a few deer right along the side of the trail. Eventually you will reach a point where the trees start to thin out and you get a great view looking down into the far end of Yosemite Valley north east of Half Dome. Enjoy the views and then continue on to the bottom of Sub Dome ( this is where the ranger checks for your permit, if he is there), the bottom of Sub Dome is a good place to plop down take a little rest, grab a snack and reapply your sun screen because a great load of fun is coming your way as you head up the steps of Sub Dome and this is about the last place you will have any tree cover.
The steps going up Sub Dome are long and steep, many of these steps are over 1 1/2 feet high some as high as two feet high, so be ready for a leg burner of a workout as you make your way up. Funny enough I’m afraid of heights and this section does not bother me, but other people find it sketchy because there is no cable or railing. Eventually as you start to near the top of Sub Dome you will loose the stairs and trail and you will have to just make your way up, you can also look for cairn ( little piles of stone that mark trails) to help you find your way. As you near the top of Sub Dome you will start to see Half Dome come into view and then bam, you get the full view of the cables and your upcoming climb, as you can imagine being afraid of heights this was my problem area.
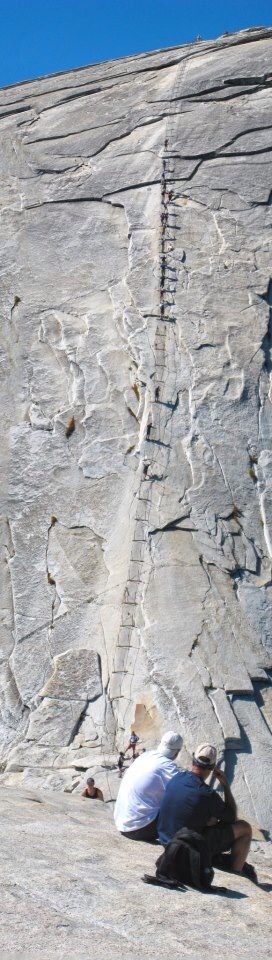
The Cables going up Half Dome
This is where people will start to second guess them selves, your looking at these cables thinking to yourself, am I really going to head up those things. There is hardly any room to maneuver once you are in the cables, many times you will be going up as someone is coming down or visa versa and you will be squeezing past each other ( last time someone squeezing past me had his water bottle pop out of his back pack and rattle down the cliff – so make sure everything on you is secured so you don’t need to worry about it while you are on the cables), you really need to take your time and just go from one wooden slate to the next wooden slate ( these are the points at which you can rest your weight on the slate without having to hold onto all your weight with your arms).
The earlier you can get to the cables the better. There tends to be less traffic going up and down the cables in the morning, but as they day heads on into the afternoon people start to show up and then the travel up and down the cables can take a while, but again, just be patient. If someone wants to go past you going up or down just let them, the less stressed you are as you go up the cables the better. I’ve seen a couple of instances where someone will freeze up on the cables ( its pretty freaky being up there if you have a problem with heights), try not to freak them out and just head past them ( just realize that you squeezing past them makes them freak out even more). Again being someone is a little freaked out with heights I used a climbing harness with rope and a carabineer, took my time, let anybody who wanted to pass me going up or down go pass ( because again I’m taking my time) and I just keep my eyes on the trail straight ahead of me until I got to the top. There are a couple of spots on the cables where you will not have any wooden slates, I just jam my foot up against the top side of the pole for rest as I make my way past these points.
Eventually you will make your way all the way up the cables and have a great view of the surprisingly large top of Half Dome. Take your time, take as many pictures as you can ( because how often are you going to get up here) and take a much deserved break. This is where having the extra water comes in handy, there is no cover and therefore no shade. You just busted your ass getting up Sub Dome and then those blasted cables, you are going to be tired and sweaty. Having some extra water is a load of the mind at this point, remember once you get back down off of Half Dome and Sub Dome its another 4 miles before you hit water again.
When you are finally ready to head back down the cables my suggestion to you ( if you have a problem with heights) is to walk down backwards. You can keep your eyes on the mountain rather then freaking out about the height plus your weight is pulling you into the mountain where as if you where facing forward your weight would be pulling you away from the mountain. Its a much safer way of going down the cables.
Once you get down the cables and head back down Sub Dome you only have 4 miles to go before you can replenish your water in the cool, clean Merced River. After you replenish your water I would suggest going down the rest of the way on the John Muir Trail. Instead of heading back down the way you came, down the endless granite steps next to the solar toilets, head straight for the top of Nevada Falls. Once you reach the bridge that cross’s river above Nevada Falls, look for a railing to the right, this will take you down to a little overlook just to the right of the mouth of the falls, you will get a great view from here. Once your done , head back and cross the bridge, looking for the trail to the right as it skirts along the granite cliffs and eventually allows you to look back on a great view of Nevada Falls, Liberty Cap, and Half Dome in the background.
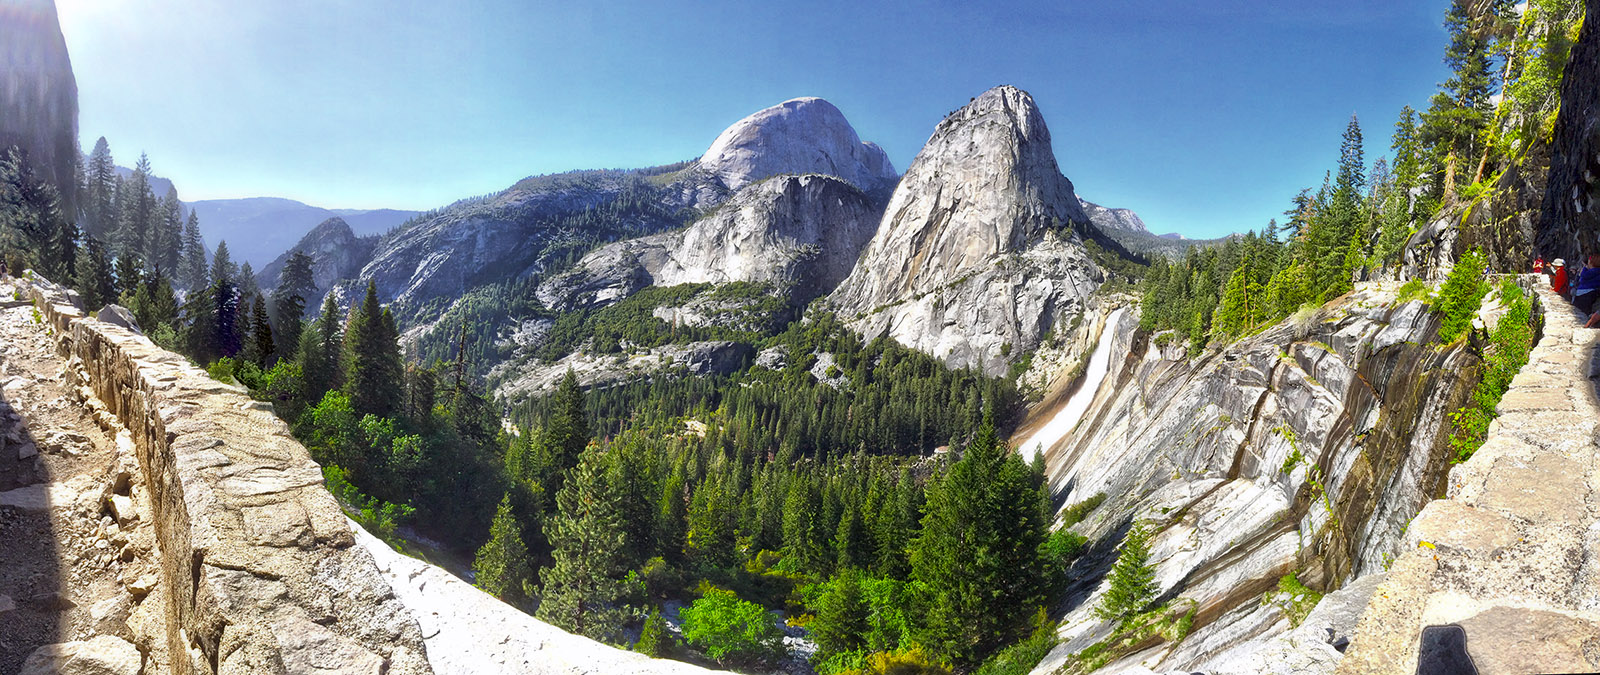
Looking back towards Half Dome on the way down the John Muir Trail
After you make it back most of the way down you will tie back into the main trail just before the Vernal Fall Foot Bridge. There is another bathroom here for you to take advantage of, and you can refill your water here as well. For a extra little treat, look for the little spring to the right of the trail just before you get to the bottom, I found it delightful to soak my tired feet in for 10 minutes or so, the ice cold water really helps with tired, sore, hot feet. Congratulations, you have just completed the Half Dome Hike !
Weather forecast for the Half Dome Hike:
Pictures from the hiking trail:


